Macros & Presets
How the tbd 16 turns a DSP engine into a playable instrument — and why the same Machine can feel completely different from one preset to the next.
- The three layers
- Why this matters
- Macros in detail
- Presets in detail
- Track setups vs. presets
- Typical workflow
- Macros for FX1, FX2 and Master
- See also
The three layers
A sound on the tbd 16 is built from three stacked layers. Understanding them is the key to everything else in this manual.
| Layer | What it is | You edit it with |
|---|---|---|
| Machine | The raw DSP engine — the actual audio code (e.g. PolyPad, Mono Synth, Rompler). | Can’t be edited — you choose one. |
| Macro | A parameter layout for a Machine: which knobs appear on screen, how they’re grouped into pages, what each knob does, and what MIDI CCs it drives. | WebUI → Preset & Macro Manager |
| Preset | A set of knob values for one specific Macro. Loading a preset sets the knobs, nothing else. | On-device Preset browser (Shift + FUNC3) or WebUI |
The relationship is strict:
Machine  ──┐
           ├──  Macro  ──┐
                         ├──  Preset
                         ├──  Preset
                         └──  Preset   ← presets always belong to exactly
                                         one Macro, which belongs to one Machine
A preset only makes sense in the context of its Macro, and a Macro only makes sense for the Machine it was designed for.
Why this matters
The same Machine can have many different Macros. That means a single DSP engine like PolyPad can be presented to the player as:
- A simple 4-knob pad (one page: cutoff, resonance, attack, release) — perfect for live playing.
- A full 24-knob sound-design rig (six pages covering every parameter) — perfect for crafting new sounds from scratch.
- Something in between — for example an 8-knob performance layout that locks the boring parameters and combines others into expressive MACRO knobs.
It’s the same audio engine under the hood. Only the control surface changes.
If a preset suddenly exposes different knobs and pages than the previous one, that’s because it’s built on a different Macro — not a different Machine. Check the Macro name in the WebUI to see the layout.
Macros in detail
A Macro defines up to six pages of four knobs (24 knobs total). For each knob it stores:
- A human-readable name (e.g. Brightness, not CC 12).
- A range (min / max / default).
- One or more output mappings — how the knob value is converted into MIDI CCs sent to the DSP.
The mapping formula is:
finalCC = start + Σ (knobValue × mul ÷ div)
Three common mapping patterns
- 1:1 passthrough — one knob controls one CC directly. The 1:1 Map All button in the Macro Builder auto-generates a full passthrough layout as a starting point.
- MACRO knob — one knob drives several CCs at once. A single Punch knob can simultaneously raise attack speed, FM depth and accent. This is the most expressive pattern and where the “macro” name comes from.
- Constant lock — a CC is fixed to one value with no source knob. Use this to hide parameters you don’t want performers to touch.
Presets in detail
A Preset is just the current values of all the knobs defined by a Macro — plus a name and optional category. Loading a preset sets the knobs; that’s it.
Because a preset carries no information about which knobs to show, it can only be loaded against the Macro it was saved with. The device enforces this — the preset browser groups presets by Macro.
Preset name conventions
Factory presets use a one-letter prefix to signal intent at a glance:
| Prefix | Meaning |
|---|---|
| F | The “default” / flat starting point for the macro (e.g. F Default). Loading it gives you the macro’s base sound with all knobs at their native defaults. |
| H | A “hero” or showcase preset — the demo voicing, the one to play first when exploring the machine. |
| P | A performance/character variant — opinionated tweaks meant for live use rather than a clean baseline. |
The prefix is just a naming hint, not a behavioural distinction — every preset is technically just a values snapshot for its macro.
Factory vs. user overlay
The SD card holds two parallel preset libraries:
- Factory presets ship with the firmware and are protected — they reload from the firmware image whenever you reset to defaults.
- User presets you save (on-device or in the WebUI) live in a separate user-overlay directory and persist across firmware updates.
The on-device browser merges both libraries transparently — you don’t normally need to think about the split. The WebUI File Manager exposes the two directories explicitly so you can back up your user overlay independently of factory content.
The on-device Sound Preset browser
Press Shift + FUNC3 from any screen to open the Sound Preset browser.
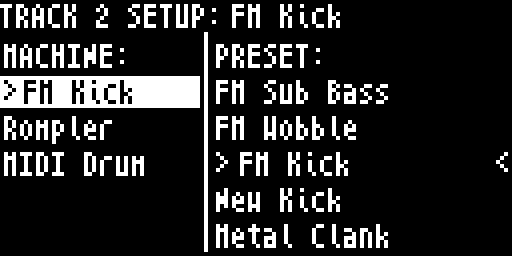
The browser has two columns:
- Left column (Machine) — the Machine / sound-engine group. The
<marker shows which group contains the currently loaded preset. - Right column (Preset) — presets available for the selected Machine. The
<marker shows the active preset. A>cursor indicates your selection.
Navigation
| Action | Result |
|---|---|
| ↑/↓ or Knob 1/2 | Browse groups (left column) or presets (right column) |
| → | Move from groups to presets column |
| ← | Move back to groups, or exit browser |
| Knob 2 click or → (on preset) | Load the selected preset |
The right column also includes a “Save preset…“ entry at the end for saving custom presets.
Loading a sound preset replaces the active track’s Machine and all its parameters. Use Change track setup if you want to reset a whole track arrangement instead of a single track’s sound.
Creating and editing presets in the WebUI
Use WebUI → Preset & Macro Manager → Presets tab. Select a track, tweak the knobs, click Save As…. Presets can be exported and imported as JSON — useful for sharing libraries between devices.
See Preset & Macro Manager for the full tool reference.
Track setups vs. presets
A preset changes the sound of one track. If you want to change the Machine / preset arrangement on all 16 tracks at once, use Project menu → Change track setup.
Factory setups ship with the device (for example default and sampler) and are marked with (F) in the browser. Custom setups saved on the SD card appear without the (F) tag. See Project Menu for details.
Typical workflow
- Choose a Machine on the track (
Shift + FUNC3, left column). The Machine determines what DSP is available. - Choose a Macro — in practice this happens implicitly: you pick a preset, and the preset drags along its Macro. Advanced users can create new Macros in the WebUI for the same Machine.
- Tweak and save — turn knobs on the device or in the WebUI, then save a new preset for later recall.
A Macro without any presets is perfectly fine — the device uses the Macro’s default knob values. Presets just give you named snapshots to jump between.
Macros for FX1, FX2 and Master
The same Machine / Macro / Preset model applies to the three bus tracks — FX1 (delay), FX2 (reverb) and Master (sum-bus + drive). Each ships with one or more macro layouts that decide how their parameters are paged across knobs, plus matching presets for quick recall. Open the WebUI Preset & Macro Manager and the track strip lets you select FX1, FX2 or Master alongside the 16 sound tracks; the picker handles all 19 tracks uniformly.
See also
- Machines — the list of DSP engines and which tracks they’re available on.
- Sound Parameters — how knob pages render on the OLED once a Macro is loaded.
- Preset & Macro Manager — the WebUI tool where you build Macros and organise presets.